This guide explains you how to execute Maven builds of multiple bitbucket repositories with a single pipeline on Jenkins when a commit is pushed, resolve the dependencies from Artifactory and deploy artifacts and buildinfo to Artifactory. Even if I’m using Bitbucket (based on Git), this can be easily replaced with Github or any other versioning control tools supported by Jenkins.
All the code that I wrote for this tutorial is available on GitHub.
1. Install Jenkins and JFrog Artifactory
2. Add a webhook on your BitBucket repositories to trigger the Jenkins job when a commit is pushed. The URL is just the address of the machine where Jenkins is installed + /bitbucket-hook/. Make it sure to write the “/” at the end of the URL because it’ll not work without it.
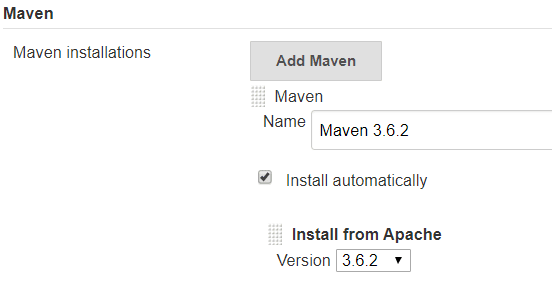
3. Configure Maven and JDK on Manage Jenkins > Global Tool Configuration
 |
|---|
| N.B. Use “Install Automatically” only if Jenkins is running on a RedHat machine, otherwise it will throw an IllegalArgumentException |
4. Create the repositories on Artifactory
- Create a local repository on Artifactory
- Create a virtual repository containing the local one
5. Configure Artifactory on Jenkins on Manage Jenkins > Configure System
In order to resolve your dependencies from Artifactory when a build is executed on Jenkins, you need to set the settings.xml
- Generate settings.xml from Artifactory by going on your virtual repository and then Set Me Up > Generate Maven Settings
- Go on Manage Jenkins > Managed Files > Add a new Config and insert your settings.xml here (you need Config File Provider Plugin)
- If you want to resolve the dependencies from Artifactory during your local builds as well, put the settings.xml also at %USERPROFILE%.m2\settings.xml. Your repository configuration should look like this:
6. Create a Jenkins Job by clicking on New Item > Bitbucket Team/Project (you need Bitbucket Branch Source Plugin for this).
- Put your bitbucket owner and credentials under Projects. Under Local File insert "pom.xml", so that Jenkins can recognize to trigger the pipeline for every repository that has a pom. After doing so, your job will be able to scan automatically all your projects.
- Create a repository containing only a Jenkinsfile with the pipeline that you want to be executed for all of your repositories. In this case the pipeline that we’re going to use looks like this:
- Connect your Jenkinsfile to your job. To do this go to the job configuration, under Projects click on Add > Remote File Plugin (you need to install Remote File Plugin), then add the informations to access the repo containing your pipeline, and specify the name of the script that you want to execute.
7. Try it out! I have two repositories on bitbucket: jenkins-project1 and jenkins-project2. The latter depends on the former, so that I can test whether the dependencies are resolved from Artifactory correctly. Let’s try building project1 and then project2
Congratulations! You successfully integrated Artifactory and Jenkins with multiple repository by creating only one pipeline. If you want to have a look of the projects that I built on this tutorial, you can find them on GitHub.


